Overview
WordPress is a popular content-publication software that can do everything from run a simple four-page web site to an eCommerce shop. Even our knowledgebase is run with WordPress, a few plugins, and a theme.
Installing WordPress
One-Click Method
As of May 10, 2016 one-clicks have returned to the control panel. To update within the control panel:
- Go to Web > Web Apps within the control panel
- Select the hostname from the dropdown list
- If you would like to install WordPress in a folder within the domain, click the dropdown and select Edit Subdir. Select or create the folder.
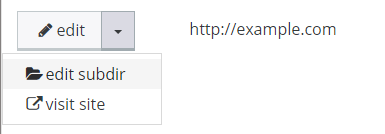
Edit Subdir indicator in Web > Web Apps
- If you would like to install WordPress in a folder within the domain, click the dropdown and select Edit Subdir. Select or create the folder.
- Click Install WordPress under Actions
- WordPress will install. A verification email will be sent to the administrative address on the account confirming your login and password.
- The destination must be empty. If there are files present, remove them first via Files > File Manager.
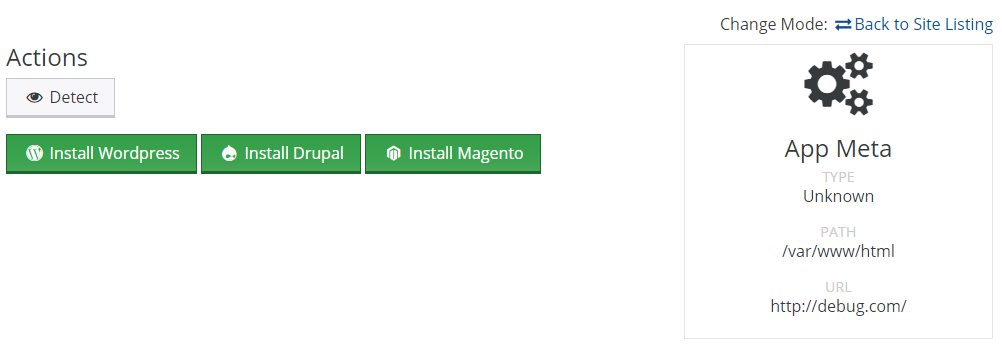
WordPress and other web app installation options in apnscp.
- The destination must be empty. If there are files present, remove them first via Files > File Manager.
Manual Method
WordPress takes about 5 minutes to install and 3 minutes to configure. Maybe more, maybe less depending upon how easily you get sidetracked.
There are 3 main components to setting WordPress up: (1) configuring a database to store information, (2) uploading the files, (3) changing permissions to allow write access. For speed, we recommend using a FTP client or terminal to setup WordPress. This will cover setting up WordPress using the control panel exclusively.
Prerequisites
- Login to the control panel
- Create a database to store data via Databases > MySQL Manager
- In this example, this database will be called
wordpresswith an account database prefixex_
- In this example, this database will be called
- Connect WordPress to a folder (document root) on your account. If installing WordPress on the primary domain, skip this step, WordPress will be installed under
/var/www/html- On a new domain, visit DNS > Addon Domains to add a new domain + document root
- As a subdomain, e.g. http://blog.mydomain.com, via Web > Subdomains to add a new subdomain + document root
- WordPress will be installed on a subdomain called
blogwith a folder location/var/www/wp
Uploading WordPress
There are three methods of getting WordPress on your account ordered from fastest to slowest and additionally sorted from most to least difficult. Choose whichever works best for you!
Option 1: Downloading from terminal
This is available only for accounts with terminal access.
- Login to the terminal
- Switch to the document root
cd /var/www/wp
- Download and extract WordPress using wget
wget http://wordpress.org/latest.zip && unzip latest.zip && rm -f latest.zip
- Move WordPress from
wordpress/back to/var/www/wpcd wordpress/ && mv * ../ && cd .. && rmdir wordpress
Option 2: Uploading with FTP
This is the fastest method, supported by all accounts, to get WordPress up and running:
- Download the current WordPress distribution, latest.zip
- Login to the FTP server
- Navigate to remote directory designated as document root for WordPress
- Upload those files located inside
wordpress/in thelatest.zipfile to the remote directory
Option 3: Uploading files in control panel
FTP is much quicker to upload files. If you’re comfortable with using a FTP client, use a FTP client to save some time (and a considerable number of steps).
- Visit Files > File Manager within the control panel
- Switch to the new folder by selecting Change Directory > Browse… under Current Path
- Within Commands > Remote URL enter
http://wordpress.org/latest.zipthen click Download and Extract- Delete
index.htmlif it exists. This is a placeholder file and will take precedence over WordPress’s index file,index.php. To do so, hover over the file, go to Actions, select the Delete action - WordPress’ latest version will be downloaded to your account, then extracted in the current directory
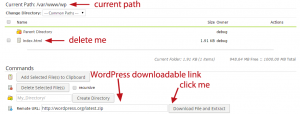
Summary of actions to do in File Manager: remove index.html, enter URL, click button.
- Delete
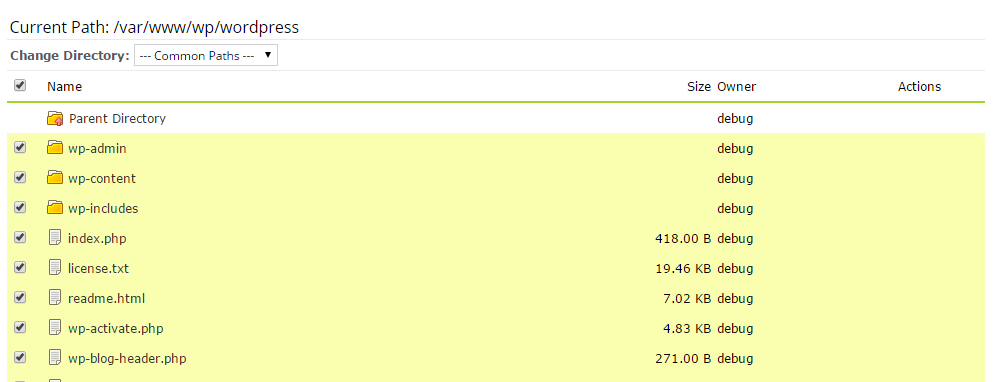
- Navigate to the newly created
wordpress/directory to move all files down a level - Select all files, under Commands > Add Selected File(s) to Clipboard
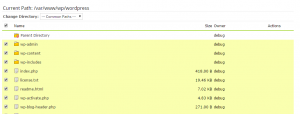
WordPress bulk selection files in the control panel. These files will be moved down a directory.
- Move back up a directory by clicking Parent Directory
- Select all files under Clipboard Contents, click Move

Managing WordPress clipboard contents to move up a directory.
- Additionally remove the now empty
wordpress/directory. Select the directory, Commands > Delete Selected Files + select recursive


WordPress installation wizard
Now that WordPress is up and running, we need to setup a default configuration.
- Visit your WordPress web site
- In our example, from the Prerequisites step, it would be http://blog.mydomain.com
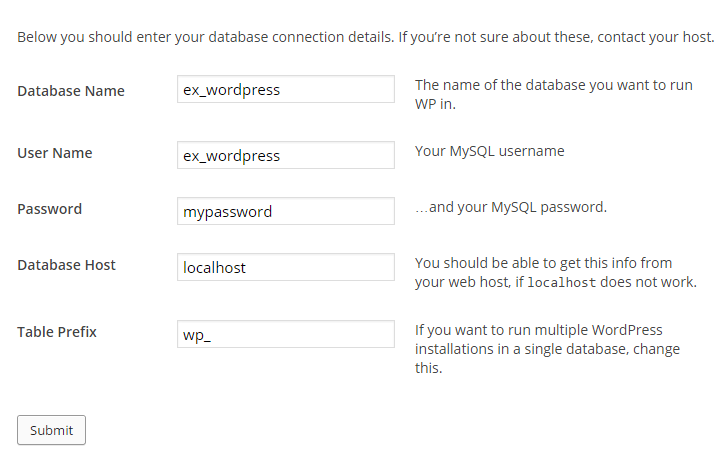
- Plug in your database details
- Database Name is the database created earlier in Databases > MySQL Manager
- In our example, this is
ex_wordpress
- In our example, this is
- User Name is either the username logged into the control panel to create the database or another user separately created to access the database
- Use a separate user to keep your master database password secret
- Password is the corresponding password
- Need to reset your MySQL password? See KB: Resetting MySQL password
- Database Host and Table Prefix will remain the same (
localhost/wp_)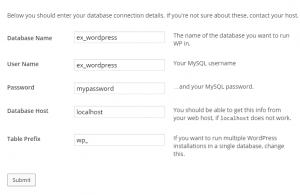
WordPress database settings following this walkthrough.
- Database Name is the database created earlier in Databases > MySQL Manager
- WordPress needs to store this configuration file inside its application directory. With security restrictions in place (it’s for your own good!) this file must be uploaded separately either through the terminal, FTP, or control panel.
- Using a basic text editor like Notepad or TextEdit (see How to Set Up TextEdit as HTML or Plain Text Editor) copy and paste the wp-config.php contents to a new text file
- Save this file as
wp-config.php - Upload to your WordPress location, in this example it’s
/var/www/wp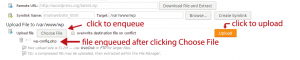
Uploading wp-config.php during installation in the File Manager.
- Click Run the install in WordPress’ installer to complete installation
- Select a username apart from
admin - Choose a strong password. Accounts are hacked either by outdated WordPress installs or easy password. Stay vigilant and keep your account secure.
- Select a username apart from
- Done! Now login to your WordPress dashboard and have fun.

Permit write-access
Write-access will allow WordPress to store files in certain locations, while preventing access to modify/delete/create files elsewhere. This is a necessary precaution to help keep your account safe. See KB: enabling write-access. By default, we recommend enabling write-access to only wp-content/uploads/. Media files may be uploaded through WordPress and files in these directories go through an extra security measure to serve all files as if they were media files (prevents hackers from uploading malicious PHP files to these locations).
See Also
- KB: Updating WordPress
- KB: WordPress category
- WordPress Codex (main documentation)
- WordPress Lessons
- WordPress Themes
- WordPress Popular Plugins